
-
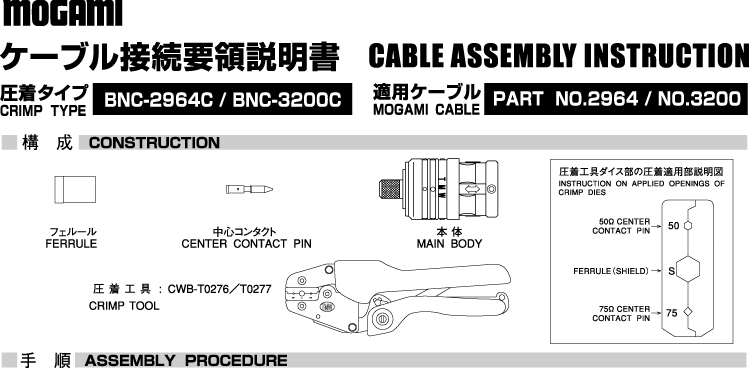
フェルールをケーブルに通しておき、下図のようにケーブル外被、シールド、絶縁体を
切り取る。このとき、シールドは撚りを戻して平行な状態にする。
Having placed ferrule over the cable jacket first, remove outer jacket, shield
conductor and dielectric as shown in figure 1. (For respective dimensions,
refer to the dimension table above.) Straighten the served(spiral)shield
conductor horizontally alongside the cable, and twist center conductor firmly
toward originally stranded direction.
-
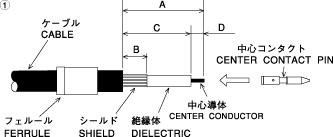
中心コンタクトにケーブルの中心導体を挿入する。次に、左図のように圧着工具ダイス
の圧着適用部に装着し、絶縁体、中心コンタクトの段部、ダイス端面の間に隙間が開か
ない様に軽く押し当てながら圧着する。次にケーブルと中心コンタクトを相互に軽く引
っ張り、コンタクトが固定されていることを確認する。
Insert cable's center conductor into the center contact pin, and put it on
specified opening of the crimp tool dies. Butting it to the crimp dies softly
not to be any gap between cable dielectric, uneven part of the center contact
pin and the crimp dies surface, crimp it as shown in figure 2.
-
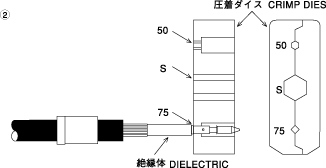
ケーブルをコネクタ本体にコンタクトが固定される位置まで挿入する。このとき、シー
ルドはコネクタ本体圧着部の外周面に均一に被せる。次に、ケーブルとコネクタ本体を
相互に軽く引っ張り、中心コンタクトが固定されていることを確認する。
Insert the cable into the main body up to the position where the center contact
pin can be fixed. At the same time, the cable shield shall be placed uniformly
over the crimped part of the main body as shown in figure 3. Then, pull the
cable and the main body a little (within 1.5 Kgf power) to make it sure if the
cable (center contact pin) is firmly fixed with the main body.
-
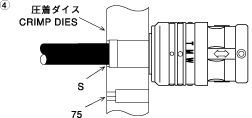
フェルールをコネクタ本体圧着部にスライドさせて被せる。このときフェルール端面を
コネクタ本体端面に密着させる。次に、圧着工具ダイス真中のシールド圧着部に左図の
ようにダイス端面と本体を密着させて装着し、圧着する。
Slide the ferrule over the shield conductor onto the crimp part of the main
body and stick the end of the ferrule to the bottom of the main body as shown
in figure 4. Then, put it on specified opening of the crimp tool dies,
sticking the bottom surface of the main body to the dies surface as shown in
figure 4, and crimp it.
-
結線完了
Finish.

MIT INC.


